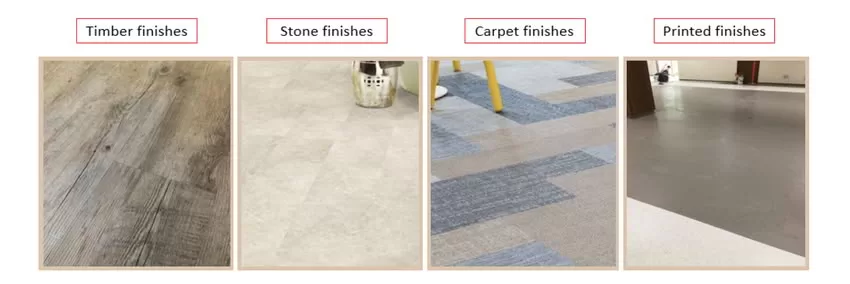
Vinyl flooring is a highly popular flooring material with the advancement in manufacturing processes especially in the decor printing technology where it can literally mimic any kind of surface including wood, marble and even carpet pile designs.
Vinyl flooring is easy and economical to maintain as it resists wear and tear and keeps its shine without wax, polish, or buffing. Unlike natural material floorings, vinyl flooring is not affected by water and is easy to replace. While it is offered as an alternate floor finish over timber, stone, ceramic, and carpet in terms of cost and productivity, vinyl flooring also has its challenges especially in increasing awareness on safety and environmental aspects.
This article focuses on good industry practices for vinyl flooring installation for newly built construction projects. By understanding this step by step guide, you will learn how vinyl flooring products are installed with industry standards.
Characteristics of Luxury Vinyl Flooring
The main composition of vinyl flooring is plastic resin manufactured from ethylene and chlorine, i.e., polyvinyl chloride (PVC). Currently, it is available in sheet, tile or plank format with solid or rotogravure finishes. The common thickness ranges from 2mm to 5mm.
Some vinyl plank flooring is made of recycled vinyl but can be more prone to expansion and contraction issues as well as potential hazardous substances.
Vinyl sheet is normally glued down to the substrate. Vinyl tile and plank can be glued (some with self adhesive option) or laid as floating system with “Lock & Click” or tongue and groove. A cushion underlayment can be incorporated for better acoustic performance and comfort.
There is also another type of vinyl flooring called Vinyl Composite Tile (VCT) that has very little vinyl as a binder of which 85% are limestone. The advantage is limestone is rigid with minimal movement when exposed to hot or cold temperature. However, it has lower static load resistance and breaks easily due to irregular subfloor surface. In addition, it is susceptible to water and require regular waxing to seal the surface to prevent water penetration. In view of the properties, it is not suitable for local application and hence not be covered in this article.
Pros and Cons of Luxury Vinyl Flooring
Pros
Vinyl flooring is a cost effective option, easy and fast to install with no tonality issue (provided it is from same batch of production). It is not susceptible to moisture as compared with timber, stone, ceramic and carpet. For application with adhesive, urethane or modified-silane adhesives will be a better choice to
avoid issues in contact with moisture/water.
Vinyl Flooring can be easily replaced (no hacking involved) and ready for foot traffic almost immediately especially for those that adopts floating installation.
Maintenance cost is low as only daily sweeping or dry mopping is required. The design can also be catered to hide and disguise dirt from day-to-day foot traffic.
Cons
However, it is not as hard as stone and ceramic and susceptible to scratches especially for pure vinyl flooring. This can be overcome by incorporating a special UV coated wear layer with varying thickness to reduce scratch, stain, scuff, gouge and improve chemical resistance.
In addition, not all vinyl flooring are suitable for heavy duty/traffic areas e.g factory, warehouse etc. Please check with the manufacturer for recommendation.
Vinyl flooring, especially vinyl tile and plank can be subjected to peaking and curling when exposed to direct sunlight over a prolonged period.
Product Specifications in Luxury Vinyl Flooring
Type by Constructions
By industry classification, vinyl floorings can be classified as homogeneous and heterogeneous. Homogeneous vinyl comprises just a single layer were
- Homogeneous & Heterogeneous: Homogeneous vinyl consists of a single layer (solid color), while heterogeneous is multi-layered with a design layer. Homogeneous and Heterogeneous floorings can be either in sheet style or tile style.
- Vinyl Sheet Flooring: Available in rolls, often used for seamless, water-resistant applications in hospitals and commercial spaces. Vinyl sheet flooring are generally referred to as homogeneous or heterogeneous floorings.
- Vinyl Composition Tile (VCT): A durable, traditional tile comprising limestone and a vinyl binder, common in commercial settings.
- Luxury Vinyl Tiles (LVT) / Planks (LVP): Multi-layered, modular vinyl that simulates natural materials like wood or stone.
- Rigid Core Flooring (SPC/WPC): Includes Stone Plastic Composite (SPC) or Wood Plastic Composite (WPC) cores, known for high dimensional stability and impact resistance.
Thickness
Different types of vinyl flooring have different thicknesses applied. For sheet style floorings it is common with 2.0mm or 3.0mm thickness. LVT / LVP can range from 1.3mm up to 6mm thickness. Rigid core SPC can have a range from 5.0mm up to 10.0mm. This thickness guide line is not absolute as new structurer designs may add variation to how thick the overall materials will be.
| Type | Common Thickness | Common Size |
|---|---|---|
| Homogeneous Flooring | 2mm ~ 3mm | 2m width by 20m length |
| Heterogeneous Flooring | 2mm ~ 3mm | 2m width by 20m length |
| Vinyl Composition Tiles (VCT) | 2.5mm ~ 3.5mm | 30cm x 30cm |
| Luxury Vinyl Tile (LVT) Dryback | 1.5mm ~ 3mm | 18cm x 122cm |
| Luxury Vinyl Tile (LVT) Loose Lay | 4mm ~ 6mm | 22cm x 122cm |
| Luxury Vinyl Tile (LVT) Click | 6mm ~ 8mm | 22cm x 152cm |
| Rigid Core SPC Click | 6mm ~ 8mm | 22cm x 152cm |
| Rigid Core WPC Click | 8mm ~ 10mm | 22cm x 152cm |
Wear Layer Thickness
| Metric system | ASTM | Common Warranty |
|---|---|---|
| 0.15mm | 6mil | for 5 years commercial or 15 years residential |
| 0.30mm | 12mil | for 10 years commercial or 30 years residential |
| 0.50mm | 20mil | for 15 years commercial or lifetime residential |
Specification Standards
| Criteria | Standards | Specification |
|---|---|---|
| Dimensional Stability | EN ISO 23999 | ≤ 0.25% for tile ≤ 0.40% for sheet |
| Curling (after exposure to heat) | EN ISO 23999 | ≤ 2 mm |
| Residual Indentation | EN ISO 24343-1 | ≤ 0.10 mm and ave 0.03 mm |
| Wear Layer thickness | EN ISO 24340 | 0.7mm 0.55 mm 0.50mm 0.3 mm 0.2mm |
| Total Thickness | EN ISO 24346 | -10% / +13% (average) and not more than 0.1mm |
| Total Weight | EN ISO 23997 | +13% / -10% |
| Abrasion Resistance | EN ISO 10581 (Homogeneous type) EN ISO 10582 (Heterogeneous type) | Type 1 |
| Slip Resistance | SS485 EN 13893 (dry floor) DIN 51130 | Coefficient of friction ≥ 0.4 (dry floor) Class DS R10-R11 (horizontal) R12-13 (slope) |
| Castor Chair Resistance | EN ISO 4918 EN 425 | Pass (occasional/continuous use) Type W castor |
| Light Stability (Colour fastness to artificial light) | EN ISO 105-B02 | Rating ≥ 6 |
| Flammability / Smoke Emissions | EN 13501-1 or EN 14041 or EN ISO 9239-1 | Bfl-s1 |
| Flame Spread / Ignition | EN 13501-1 or EN 14041 or EN ISO 9239-1 | Sprinkler-protected (sleeping) Class C Sprinkler-protected (non-sleeping) Class D Non-sprinkler-protected (sleeping) Class B Non-sprinkler-protected (non-sleeping) Class C |
| Cigarette Burn Resistance | EN 1399 | min Class 3 |
| Stain and Chemical Resistance | EN ISO 26987 | Class 0 |
| Seam Strength (welded joint) | EN 684 ISO 16906 | Average ≥ 240N/50mm Individual ≥ 180N/50mm Pass |
| Fungi & Bacteria Resistance | ISO 846 (Method A – Fungal Growth Test and C – Resistance to bacteria) | Does not favour growth |
| Locking Strength (click and lock tile/plank flooring) | ISO 24334 (based on measurement at F0.2mm) | 5mm thick Long Side – 1.30 KN/m End Face – 2.50 KN/m |
| Form of Delivery | EN ISO 24344 (for rolls) EN ISO 24342 (for tiles) | |
| Furniture Leg | EN 424 | No damage |
| Flexibility | EN ISO 24344 | Method A – No cracking |
| Toxicity test (Toxic Fume) | BS EN 45545-2 EN ISO5659-2 | CIT < 0.75 |
| Phthalate Content | EN 14041:2018 | Refer to EN 14041:2018 Table 4 ≤ 1,000 mg/kg |
| Lead Content | EN 14041:2018 EN 1122:2001 | Refer to EN 14041:2018 Table 4 ≤ 1,000 mg/kg |
| Cadmium Content | EN 14041:2018 EN 1122:2001 | Refer to EN 14041:2018 Table 4 ≤ 100 mg/kg |
Installation
Common Methods
In general, there are 2 methods of installation common for commercial projects
- Glue-down
- Floating
Glue Down Installation
Vinyl sheet flooring is generally glued down for maximum safety and durability. For vinyl planks or tiles it is installed in glue down or floating style depending on the requirements. Glue down method requires the adhesive to harden for at least 24 to 72 hours before it is ready for traffic.
Floating Installation
For the Floating installation, click and lock system are mostly common for commercial settings. Using click technologies such as Unilin and Valinge 2G, vinyl tiles and planks can be installed jointly. Loose lay is another common installation method, but mostly applied for residential setting rather than commercial settings.
Moisture in Concrete and C&S (Cement and Sand) Substrates
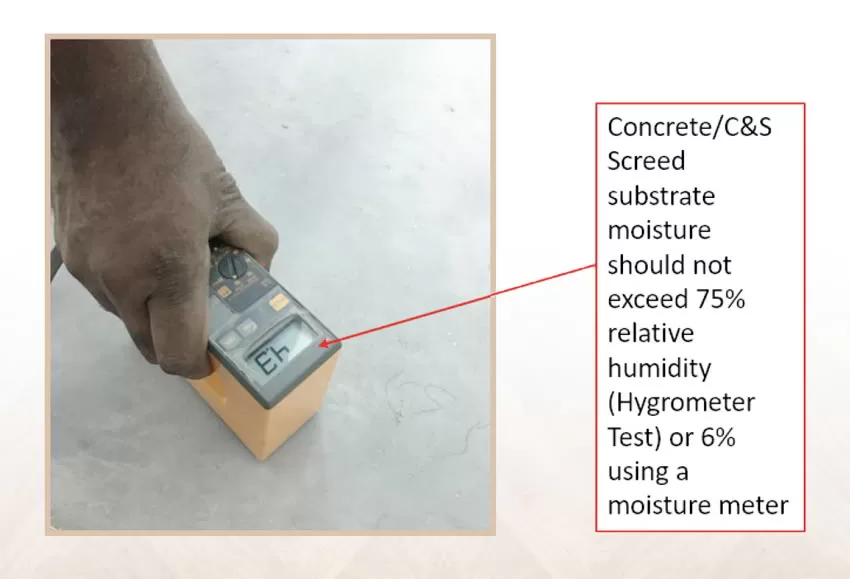
For concrete substrate, BS 8203 states that humidity levels must not exceed 75% relative humidity (Hygrometer Test).
Alternatively, test with a moisture meter and it should not exceed 6% However, please take note of the limitation of the depth using moisture meter. When in doubt, drill a hole and insert a probe to check moisture deeper. Most moisture meter will have a connection for the probe. Checking the casting date of the concrete slab and C&S substrate will help to ensure they are properly cured. High moisture/dampness issues should be resolved before laying levelling compound on any floor coverings.
Level of Concrete and C&S Substrates
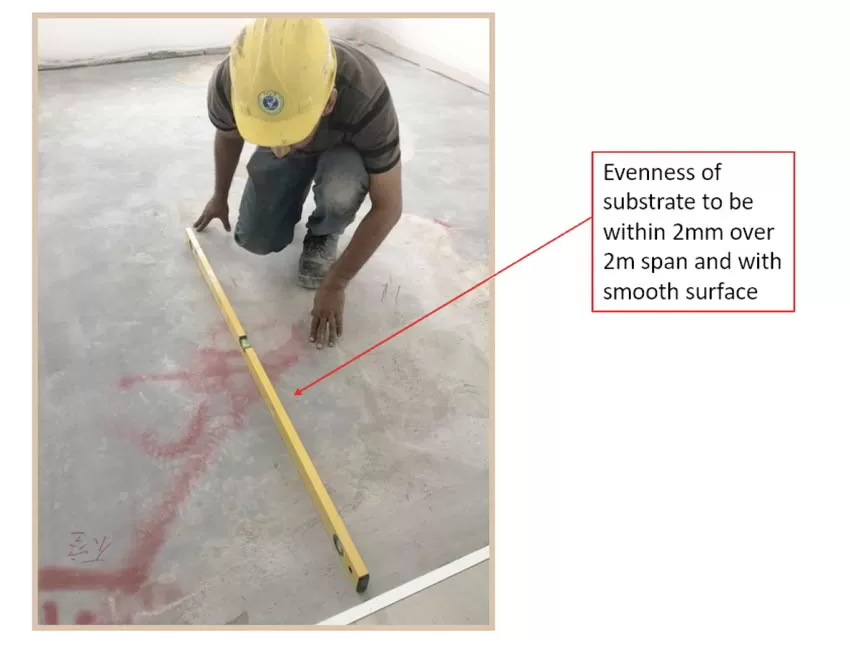
The surface level of the substrate should not be more than 2mm over 2m span and with smooth surface. Pre-packed smoothing and self-levelling compound is good for improving the levelness of substrate. It is usually quick set and ready for installation shortly.
For vinyl flooring, smoothness of the substrate is critical to avoid telegraphing the imperfection in the substrate to the surface due to the thickness and flexibility.
Curing Compound, Sealer, Hardener Issue
For installation of vinyl flooring with adhesive, residue of curing compound, sealer, and hardener on the concrete/screed might affect adhesion.
To test, sprinkle water on concrete/screed surface and observe. If water starts to be absorbed in 15-20 seconds, likely there is no residue. If water stays beaded up, it is likely there is still residue of curing compound/sealer.
Watch out for areas near walls, as the curing compound might dissipate at slower rate due to lower traffic.
Possible solutions are shot blasting or mechanically abrading the concrete/C&S surface to remove the residue. Using acid to chemically remove the curing compound is not recommended, as residue will affect bonding and it is not environmentally friendly if discharged to the drainage system.
Acclimatisation Requirement
Prior to the installation, vinyl flooring products require at least 48 hours of acclimatization to avoid latent defects like opening or curling of joints. Vinyl will expand and contract depending on the temperature and air humidity. Though, some advanced vinyl flooring products are designed to be acclimation free, which can help projects and builders to save on the acclimation waiting time.
Equipment & Tools
Vinyl Sheet Floor (glue-down method)
- Sharp Utility Knife – for cutting and trimming
- Straight edge – for cutting seam
- Collar/brush/Grooved Spatula – for applying adhesive
- Roller/push broom – for installation and removal of air bubbles
- Hot Air Hand Tool – for softening vinyl and adhesive for dressing
- Heat Weld – for welding the seam with a weld rod
- Auto Groover and Hand Groover – for cutting groove for heat welding
- Spatula/Trimming knife – for skiving welded seam
Vinyl Tile/Plank Floor (floating method)
- Sharp Utility Knife – for cutting and trimming
- Double sided tape – alternative for holding down area to prevent movement particularly at door area
- Roller – for levelling the joint
- Pull bar – for closing stubborn seam
- Rubber mallet – for compacting
Handling and Storage
To observe the supplier’s instruction in storing the vinyl flooring and adhesive. Handle with care including condition of the storage area and stacking instruction to avoid distortion of the material.
In general, vinyl sheet in roll should be stored upright.
Materials from different batches of production need to be identified to avoid tonality issues
Vinyl Flooring with stripes
For vinyl woven flooring with stripes (especially woven flooring), the stripes should be oriented toward the light direction (window) or lengthwise within the room (traffic direction). For corridor, the stripes should be laid in the same direction of the traffic flow.
Installation Guides
1. Preparation
- Check level of substrate specially to flush with other floor finishes or divider.
- No hollowness for concrete and screed substrate. For other substrate, ensure it is rigid and sound.
- Check moisture level of concrete and screed substrate.
- Ensure other wet trades are completed and area can be sealed to prevent contact with rainwater.
- Depending on the site condition, ensure wall finishes are completed and door frame installed.
- The floor to receive vinyl flooring should be clean, smooth, flat and dry. All holes and cracks must be patched.
- Evenness of substrate not more than 2mm over 2m span.
2. Steps for Glue-down Vinyl Flooring
- Plan the installation, especially on the direction of the roll. For large space, mark the edge on the floor to ensure alignment.
- Depending on the choice of adhesive, a primer coat may be required for better bonding.
- Install vinyl sheet roll according to installation plan. Lap fold vinyl sheet one half at a time and roll a thin, consistent adhesive using the paint roller. Based on manufacturer’s recommendation, allow for the adhesive to dry (tacky to touch state) before laying back the vinyl sheet. If the adhesive is not completely dry before installing the vinyl sheet, bubbles may be trapped under the vinyl sheet.
- Start from the centre, remove air under the vinyl sheet using a roller or push broom. Do not twist the vinyl sheet when placing it onto the adhesive. Repeat installation process for the remaining half of the vinyl flooring.
- Trim excess material along walls and corners using a sharp utility knife leaving at least 50mm excess for final trimming later.
- For vinyl sheet dressing up to skirting, it is recommended to provide a rounded foam/coving fillet at edge to prevent damaging the vinyl sheet at sharp bend. Blower may be used to soften the bended edge for the upturn. A wall capping strip is commonly used to tuck the vinyl sheet under for terminating at wall.
- For working at corners and projection (e.g. floor trap cover, etc.), make relief cut to allow the material to lay flat before the final cut. Final trimming should be done by cutting in with a sharp utility knife or trimmer allowing a minimum 3-5mm expansion gap. Final cut must be made before applying the adhesive. Seal joints with cut edge around fittings with silicone mastic.
3. Heat Weld seaming the joint
- Grooved seam with a groover to recommended depth to form a “V” shape groove.
- Install the correct diameter of welding nozzle and weld rod to the Heat Weld as recommended by the supplier Clean welding nozzle with a wire brush to clear debris Check temperature of welding nozzle before welding as recommended. Move Heat Weld along the grooved seam with the weld rod feeding through the welding nozzle at recommended speed and temperature.
- Wait for weld rod to cool down before cutting off the surplus.
4. Floating Vinyl Plank
- Plan the installation according to the approved layout. In most cases, the plank is laid parallel to the entrance to minimise movement caused by traffic and for aesthetic purpose. Some manufacturer/consultant may prefer the first plank to be glued to avoid movement. For tongue and groove (T&G) or Click & Lock, the tongue is cut off for the first row using a utility knife. For Click & Lock, the next piece is inserted at a slight angle to click into place.
- For cutting to length, use utility knife and snap. Trimming with utility knife may be required for loose edge.
- A rubber mallet is normally used to compact the planks. A small roller may be used to level the joint if necessary. Allow a minimum 3-5mm expansion gap at edges and around door frame and fittings. Seal joints with silicone mastic or cap with a trim. For transition with different floor finishes and butting with sliding door frame, a cap/trim is recommended to accommodate expansion.
- Clean to remove glue/remains from the installation process. Keep area clear from traffic for 24 hours (for glued area). Protect the vinyl flooring if needed. After installation, the surface of vinyl flooring needs to be protected from damages before handing over. One of the preferred choices is using light corrugated plastic sheeting. Corrugated plastic sheeting are lightweight, durable, reusable, and water resistant for protection usage. It is recommended to tape all the joints and edges to prevent dirt or water from being trapped underneath.
5. Skirting for Vinyl Plank
- The installation of skirting is usually done after the installation of vinyl flooring and protection cover. Apply adhesive evenly on the back of the skirting and glue it onto the wall. Alternatively, uPVC skirting is used where the inner profile is either nailed or glued. It is capped with a laminated outer profile. Some products come with self-adhesive tape for easy mounting of inner profile to wall.
- Fix in masonry nails at regular intervals along the skirting to enhance fixing to the wall.
- Check for squareness and alignment of skirting after installation. The requirements for skirting squareness and alignment are not more than 4mm over 300mm and 3mm over 1.2 m respectively.
- Seal off the joint between skirting and wall joint with sealant.
6. Repairing
For vinyl floor tile/plank, the recommended approach is to replace marred or damaged tile/plank. As most vinyl floor tile/plank are flexible, cutting the tongue of the replacement piece may not be necessary as it can be bent and inserted into the groove in existing tile/plank. If cutting the tongue is required, apply adhesive for bonding to the substrate. Cover with wax paper and add weight over glued area to ensure perfect patch until properly cured.
For vinyl sheet, small cuts and scratches can be patched using a clear liquid seam sealer (water based resin). Start by cleaning the damaged area with lacquer thinner and apply the sealer. Upon drying, the repair will be virtually invisible.
For serious damages like burns or tears, the damaged area will be cut (i.e. using double cut method to ensure perfect match) and press in the replacement patch with adhesive. Prying out the cut damaged vinyl patch may require heating with electric heat gun to soften the existing adhesive especially when it is a non-pressure sensitive adhesive. Cover area with wax paper and add weight over patched area until cured to ensure perfect patch.
Recommended Maintenance
The recommended maintenance for vinyl flooring are as follows:
- Place protective pads for heavy furniture or appliances.
- Use mat at the entrance (with slip resistance backing) to minimise soiling and scratching.
- Avoid rubber-backed mat as it might permanently stain some vinyl floors.
- Sweep or vacuum regularly.
- Wipe up spills immediately.
- Damp mop with approved cleaner for deeper cleaning.
- Avoid oil soap and dish washing detergent as it will leave a soapy residue that dirt will stick on.
- Avoid placing hot objects on the vinyl floor.
Product Issues and Potential Failures
Bubbling / Detachment
To avoid bubbling in installation of vinyl flooring with adhesive, allow the adhesive to dry to a firm tack before laying.
As vinyl flooring is impervious, it prevents excess moisture from evaporating and in the long term, detachment and bubbles may occur. Always check the moisture level in substrate prior to installation.
If the surface bubble is found on the surface of vinyl planks especially between the layers of wear layer, decor layer, and base layer, it indicate straight product failure from manufacturing. These product needs to be returned to the suppliers for full warranty.
Tonality
Different production batches of vinyl floor material may have a slight deviation in gloss, colour, texture or pattern. To avoid such issue, do ensure the material used is of the same production batch.
For installation of vinyl floor tiles/planks, it is a good practice to blend at least two cartons for better tonality control.
Failure of heat welded seam
Slit seams or inconsistent seam gaps are workmanship issues. Slit seams will appear dull or dingy and are not acceptable in healthcare environment as bacteria and germs may harbour at the opening. It is also recommended to heat weld the seam 24 hours after the adhesive is being applied.
The recommendations are to:
- Follow manufacturer’s recommendation, especially on the required temperature for fusing the welding rod and depth of the groove.
- Practice first before actual welding. c. Recommended to use auto groover instead of hand groover for better consistency. Use hand groover only for area that cannot be reached by auto groover.
- Ensure welding tool is properly cleaned as residue at the nozzle might affect the consistency of the temperature and result in poor seam joint. Use a wire brush to clean the nozzle.
- Ensure that the speed nozzle is the correct diameter of the welding rod.
- Ensure the welded seam is cooled before trimming the excess, as welding rod has a natural tendency to shrink as it cools.
Peaking and Curling in Vinyl Tile/Plank
The occurrence of peaking and curling in vinyl tile/plank is mainly due to thermal movement, especially if the flooring is subjected to prolonged direct exposure to the sun. It is always good practice to do a mockup under the same conditions for long-term testing to test out the manufacturer’s recommendation.
Quite often, peaking and curling failure can occur due to improper installation conditions. Some of the most common failures are due to:
- Inconsistent moisture level from the installation site.
- Significant temperature change before and after installation.
- Failure to leave a gap to the walls.
- Product not suitable for underfloor heating systems.